David Hedges

  • Home
  • About
  • Contact
  • Business Blog
  • IT Blog

Using Ansible to generate inventory data

April 7, 2021 by dhedges Leave a Comment

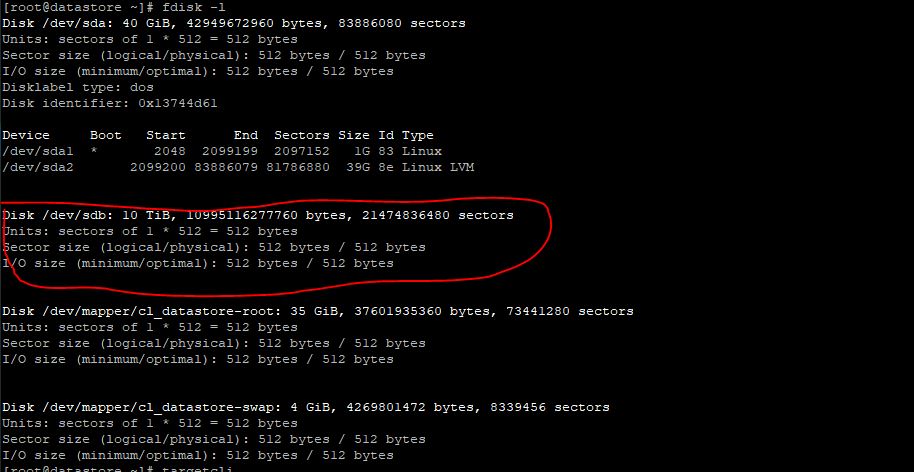
Ansible can be used to collect a lot of usable data that can be imported into an api or database driven inventory system, creating an automated way of updating hardware information.

Creating an ansible yml file to pull inventory to a json file is fairly simple:

---
- hosts: all
  gather_facts: no
  tasks:
    - setup:
      register: myinv
    - copy:
        content: "{{ myinv | to_nice_json }}"
        dest: /some/local/path/{{ inventroy_hostname }}.json
      delegate_to: localhost

running the ansible playbook generates a json file for each host. This data can then be parsed and pushed directly into a database, update a system using an api, parsed and pushed into a spreadsheet, or any number of other things that can be thought of.

using python to parse the json files, below is a snippet of how I take the data contained within the json files, and pull them into variables.

#!/usr/bin/python
import glob, json
for file in glob.glob('/path/to/json/files/*.json'):
     hwinf = json.load(open(file))
     if 'ansible_facts' in hwinfo:
          hostfqdn = hwinfo['ansible_facts']['ansible_nodename']
          hostip = hwinfo['ansible_facts']['ansible_default_ipv4']['address']

the json file is fairly easy to pull data from. From here though you have the data, and just need to determine how you will use it.

Backing up Microsoft Exchange to a samba share

January 12, 2021 by dhedges Leave a Comment

Backing up exchange by dumping mailboxes to .pst files can be done using the new-mailboxexportrequest command. This works best though when you script out the process. I have a powershell script I had written, and works for my case:

  Add-PSSnapin Microsoft.Exchange.Management.PowerShell.SnapIn
 
 Get-MailboxExportRequest -Status Completed | Remove-MailboxExportRequest -Confirm:$false
  Get-MailboxExportRequest -Status failed | Remove-MailboxExportRequest -Confirm:$false
 

get-mailbox | %{New-MailboxExportRequest -Mailbox $($_.id) -FilePath \\SERVER.DOMAIN.local\pst\$($_.samaccountname).pst}

This powershell script is pretty simple. we add in the exchange snaping, kill any export requests that have failed, or previously completed, and may fail. Then export all of the mailboxes.

On the samba host, we are assuming that the server already is bound to the AD domain and allows for local and samba auth through sssd or realm.

When new-mailboxexportrequest exports your mailboxes, it needs rights to allow the “exchange trusted subsystem” to write to the samba share. In addition to this, you need to give rights to the machine account as it initiates the connection as the exchange server machine account.

the following is an example of the share within the samba config that you could use to export pst’s of user mailboxes to.


[pst]
        comment = pst
        valid users = some_user, +domain\"domain admins", xch2019_server\[email protected], +domain\"Exchange Trusted Subsystem"
        read only = no
        path = /mnt/pst
        create mask = 664
        inherit acls = Yes

I Got CryptoLocked

September 29, 2020 by dhedges Leave a Comment

Sunday I got up and was looking for a file I had been working on. Looking through the directory I started noticing a lot of .RZN files. Thinking that was a bit odd, I kept looking, but when I saw them all over, I realized something was very wrong.

First, I thought the only exposed server that was likely susceptible, was a terminal server that was exposed, but I hadn’t been using over the past few months. I jumped over to that server, and saw it too was cryptolocked. with ransom notes all over. I took the server off the network and closed the ports used by it on the firewall.

My file server, I found a suspicious file “4004.exe” and killed and removed it. Initially it looked like I could still pull previous versions, and I had started recovering one of the file systems from the previous version. this only lasted about 5 min, then all of a sudden, all previous versions were removed on every volume. Oh well, I did get some stuff back, but what I got wasn’t really the important stuff.

I moved on to the backup server to see if I could just restore the data from there. upon connecting, this server got hit also, and what made it worse, the ransomware app formatted all the usb disks I had been backing up to. Any chance of a fast recovery was out.

I was glad I also do an online backup, going to that, I found just about everything was backed up to it! After rebuilding a new server, I kicked off a restore from that, fearing that recovery would be slow like the time I had done something similar to restore data to a server in Costa Rica. At least so far I’ve done well. the Costa Rica server took about a month to recover 300G, I’m at a little over 1T recovered in about a day and a half.

Overall, i’m almost back to normal. Though I have some thoughts about it and what I could have done better.

  1. I should have kept the RDP host updated, or just shut it down. Big mistake there.
  2. The other servers that got hit, also should have been updated a bit more often as well.
  3. Though I had good local backups, offsite backup or online backup saved me from total loss or needing to pay the ransom.
  4. I was also thankful that the issue was isolated within a single vlan and didn’t spread to the other networks.

Creating an ISCSI target on RHEL8 / CentOS8

April 13, 2020 by dhedges Leave a Comment

I recently bought a HP server that has 40T of storage outside of the OS array. I had set it up to act as an iscsi storage target for a couple of vmware hosts I run in my lab. Looking around on the internet I was able to find a lot of information on how to create iscsi targets with fileio, but not many that many that talked about utilizing direct access to block storage.

I am going to describe configuring your iscsi target on a block storage device. I am also assuming that you don’t need to open ports in firewalld or have it disabled.

  • locate the device your iscsi storage is on:
    • run: fdisk -l
  • Next install the targetcli package:
    • Run: yum install targetcli -y
  • Run targetcli
  • Create the backstores
    • Run: cd backstores/block
  • Run: create dev=/dev/<storage> name=MyStorage
  • Running “ls” should show something similar to this:
  • Creating the iscsi Targets
    • Run: cd /iscsi
  • Create a iscsi target by creating a custom IQN ( many times the format is iqn.YYYY-MM.com.example:targetdescription )
    • Run: create wwn=iqn.2020-01.com.mydomain:svrstorage
  • Running ls should show something similar to this:
  • Add ACLs for the hosts that will connect
    • Run: cd iqn.2020-10.com.mydomain:svrstorage/tpg1/acls  (using your custome IQN)
    • Create the ACL for the connecting hosts (you must know the IQN of the connecting host)
      • Run: create wwn=iqn.2019-02.com.otherhost:node1
  • Running “ls” should show something like this:
  • We need to map the LUN to the iscsi target
    • Run cd /iscsi/iqn.2020-10.com.mydomain:svrstorage/tpg1/luns  (the IQN being the remote hosts IQN)
    • Run: create /backstores/block/MyStorage
  • Running “ls” should show you something like this
  • Verify it all looks right, and exit
    • Run: cd /
    • Run: ls    and verify that your settings appear correct
  • If all of your devices and ACLs look correct, type exit to save and quit.
  • Start the iscsi target
    • Run: systemctl enable target
      • This will enable the daemon starting each time the server starts up
    • Run: systemctl start target
      • This will start the iscsi target daemon
    • At this point your remote hosts should be able to connect and see the storage you have shared.
« Previous Page
Next Page »

Copyright © 2025 · Beautiful Pro Theme on Genesis Framework · WordPress · Log in